


.png)
.png)
Automatic Replies in Outlook are vital tools for efficiently handling communication, specifically when you are “out of office” or unavailable for work. You can create a customized message that you can auto-send to anyone who sends you emails during a particular period. This helps you keep your contacts informed that you are currently away from work without having to write a manual message. This feature is quite crucial for ensuring overall professionalism, establishing expectations, and delivering active contact details if required. Irrespective of whether you are going for a lunch break or a vacation, attending meetings or receiving an unmanageable volume of emails, setting How to Set Up Automatic Reply in Outlook? A Detailed Guide allows you to remain connected and maintain courtesy without consistent oversight.
Setting up automatic replies in Outlook is very simple. Regardless of whether you are using Outlook on the web, desktop applications, or mobile versions, you can set it up anywhere. The process is all about setting up your message, choosing the right timeframe, and personalizing the content to align it with your requirements. In this guide, you will understand the detailed procedures, making sure that you can configure your automatic replies effectively and efficiently. A right setup is not only crucial for improving your communication strategy, minimizing confusion, but also enhancing overall personal conversations.
What Are the Prerequisites for Setting Up Auto Replies in Outlook?
Before you set up automatic replies in Microsoft Outlook, make sure that you meet the required prerequisites to ensure a smooth setup process. Implementing the following setups will allow you to make sure that auto replies work correctly and there are no pitfalls:
- Microsoft Outlook Account: Validate that you have access to an authentic Outlook email account. Automatic replies are generally set up within the Outlook web or desktop app, so make sure that the account is functioning and active.
- Relevant Permissions: If you are working with a work or school account, make sure that you have the relevant permissions to set up automatic responses. A few businesses pose restrictions due to the policies established by the IT department.
- Internet Connectivity: Having a stable internet connection is vital when you are setting up automatic responses, specifically if you are utilizing Outlook Web or synchronizing settings with the server.
- Access to Outlook Web or Outlook Application: You need to decide whether you want to set up automatic responses on the web or app. Both methods yield desirable results, but the configuration steps or interface changes dramatically.
- Customize Your Auto Reply: Create a perfect message that will work for all senders. You can include key information like alternative contacts, availability dates, or other relevant information that you can clearly communicate to the correspondents.
- Set the Time Frame for Automatic Responses: Set the right period in which you would want to send your auto replies. This is usually the time when you are out of the office, for example, during your vacation period, making sure that the contacts are accordingly informed.
How to Set Up Automatic Reply in Outlook?
Follow the below-mentioned steps below to set up appropriate and timely automatic replies:
For Outlook Desktop:
- Start by accessing Microsoft Outlook on your desktop.
- Next, go to the File tab present on the top-left section of the window.
- Once the dropdown menu appears, select the option “Settings.” You can also choose the gear icon present at the top of your screen.
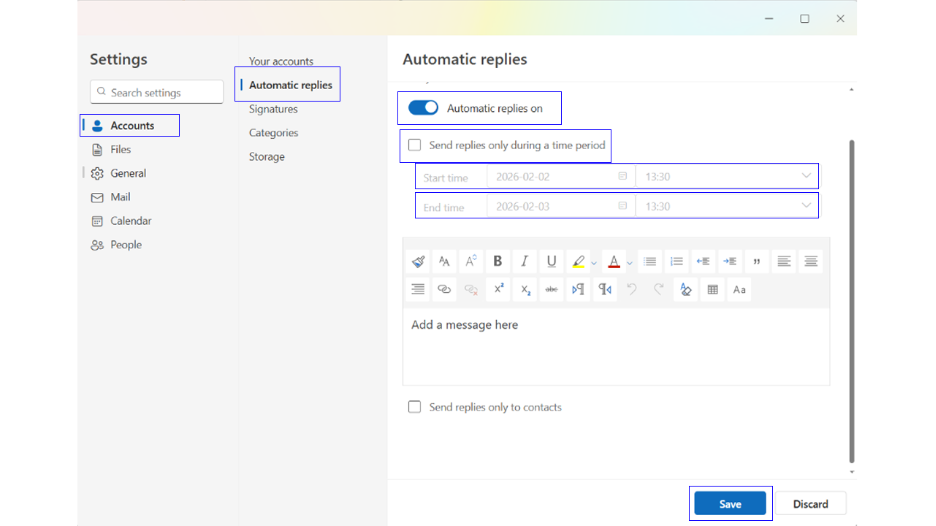
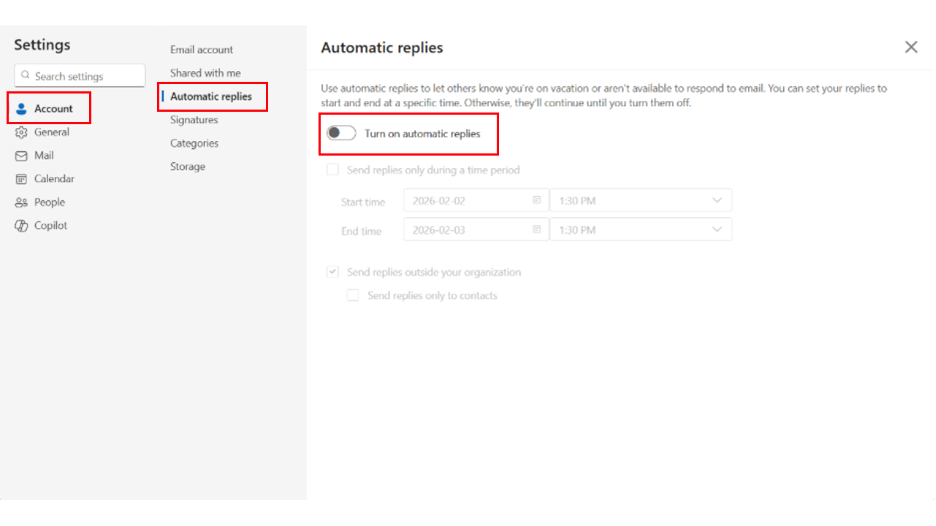
- Then, go to the option “Accounts,” and then “Automatic Replies.”
- After that, toggle on the option “Turn on Automatic Replies.”
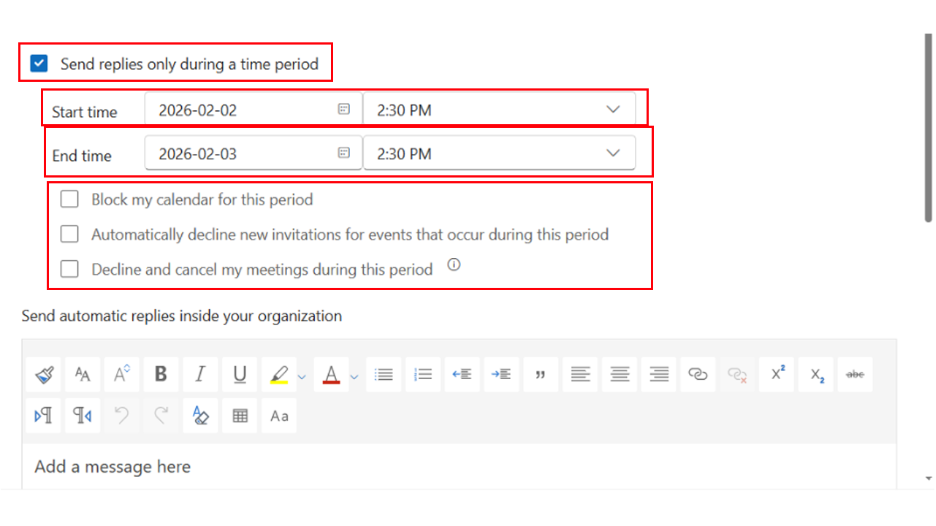
- Select the checkbox “Send Replies Only During a Time Period” if you want to send an auto reply only for a fixed period.
- Choose “Start Time” and “End Time.”
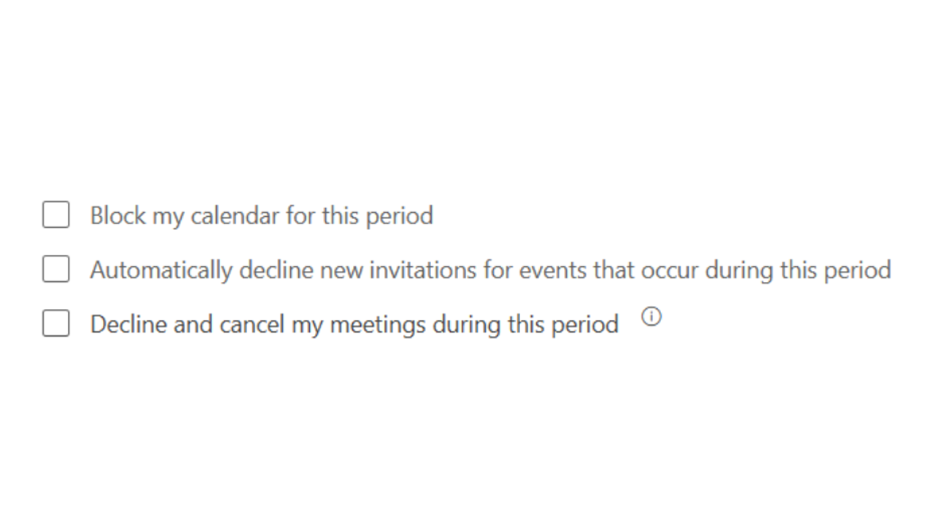
- Three more checkboxes appear that will let you choose whether you want to block the calendar, decline invitations, or cancel meetings in that particular period.
- Write a tailored message for your senders.
- If you want, you can also check the checkbox “Send only to contacts.” This will allow you to avoid sending automated messages to senders who are not your contacts.
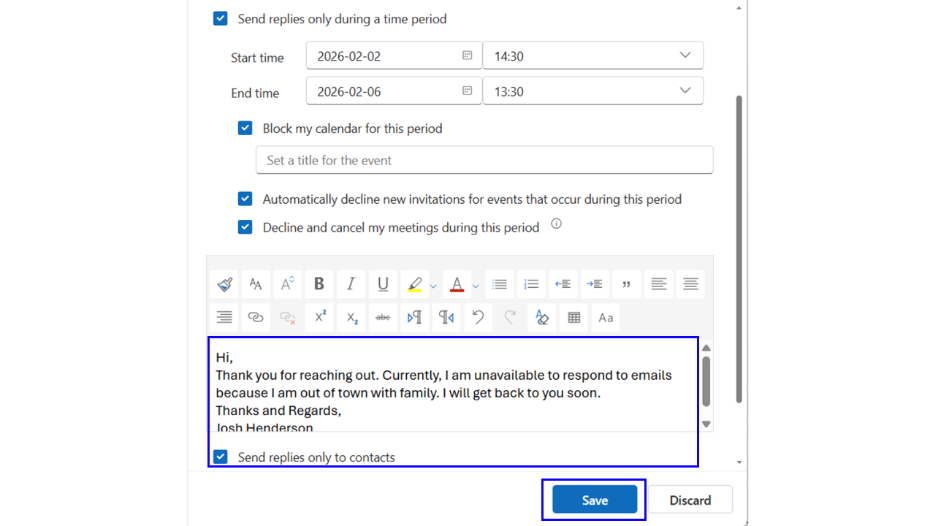
- Select the option “Save.”
For Outlook Web App (OWA):
- Sign in to your Outlook account after visiting the website: outlook.live.com. Click on the “Sign in” button, enter your credentials, and log in.
- Now, once you have logged in, you can click on the gear symbol, which is the Settings icon.

- A dropdown menu will appear. Select “Account” and then choose “Automatic Replies.”
- Toggle the button “Turn on Automatic Replies.”
- Check “Send replies only during a time period.”
- Select “Start” and “End” times.
- Check the three checkboxes for blocking calendar, automatically declining new events, or cancelling meetings for the chosen time period. You can also choose not to check them and leave them as it is.
- Enter Your Message.
- If you are using a branded email, then you can set up and customize automatic responses for people who are outside of your organization. Check “Send Replies Outside Your Organization.”
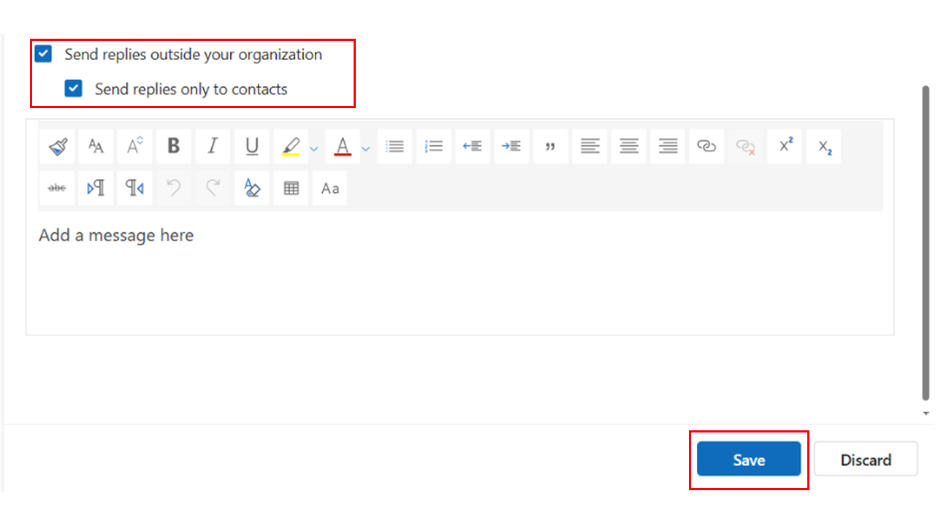
- Enter your message, review it, and then click on “Save.”
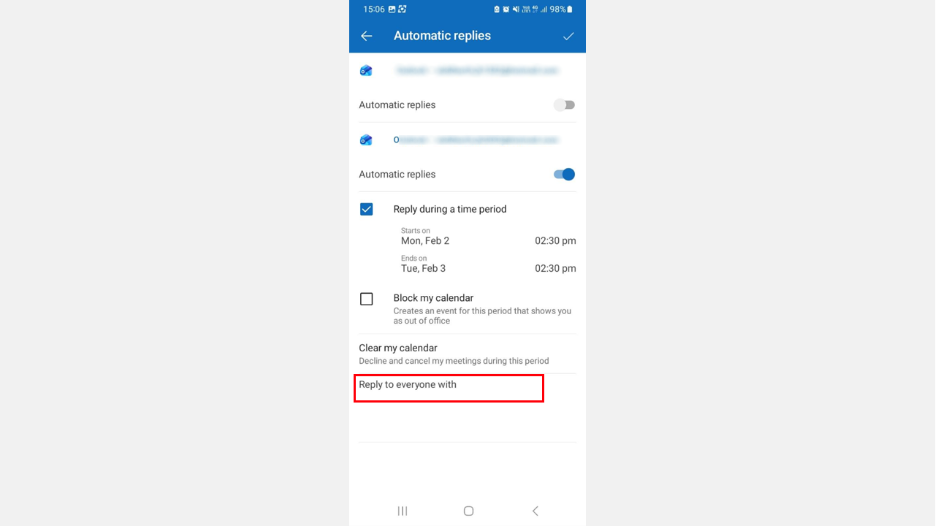
For Outlook Mobile App
- Download the App from App Store or Play Store. In most phones, the app is downloaded by default.
- Sign in using your credentials.
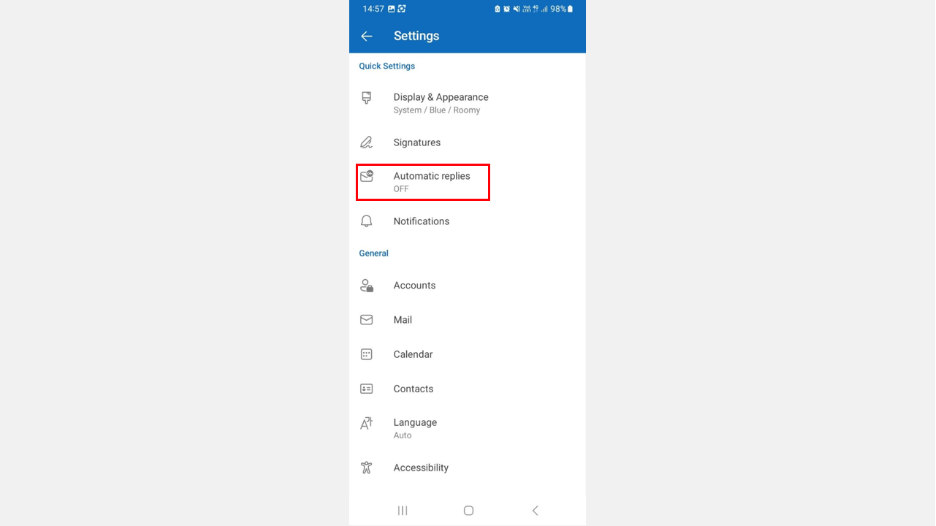
- Click on your profile and then select the gear icon to access Settings.
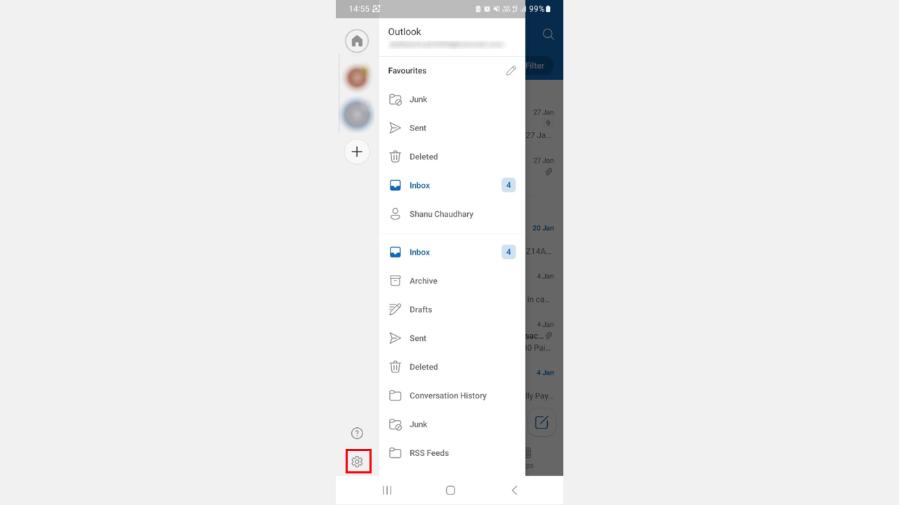
- Select “Automatic Replies” under Quick Settings.
- If you have logged in with multiple accounts, you will see all your accounts listed there.
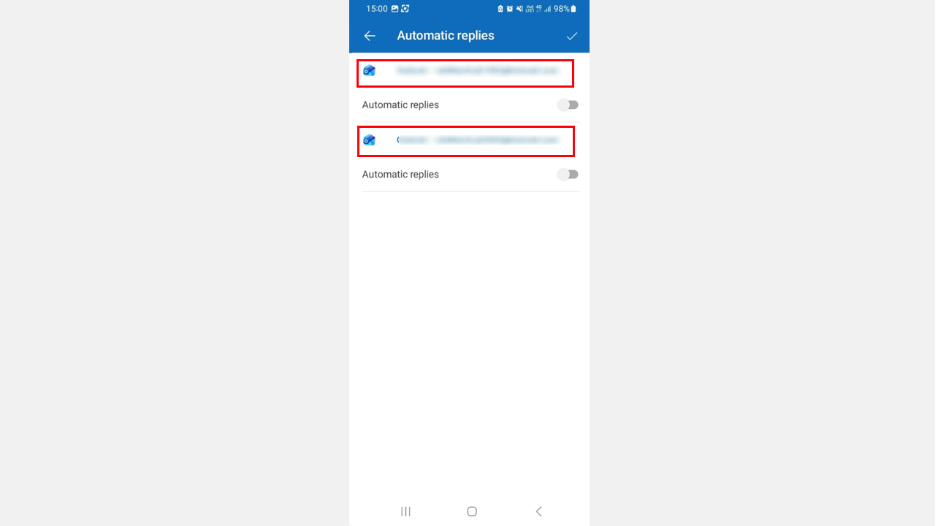
- By toggling the button “Automatic Replies,” you can choose to enable automatic replies for an email id or both ids.
- Then, similar to Desktop and Web, you can choose to set up an automatic reply for a specific time period. For this, check “Reply During a Time Period.”
- You can also check “Block my Calendar,” which will let others know that you are out of the office for this period.

- In case you have already accepted events and meetings for this period, you can cancel them with the help of the “Clear my calendar.”
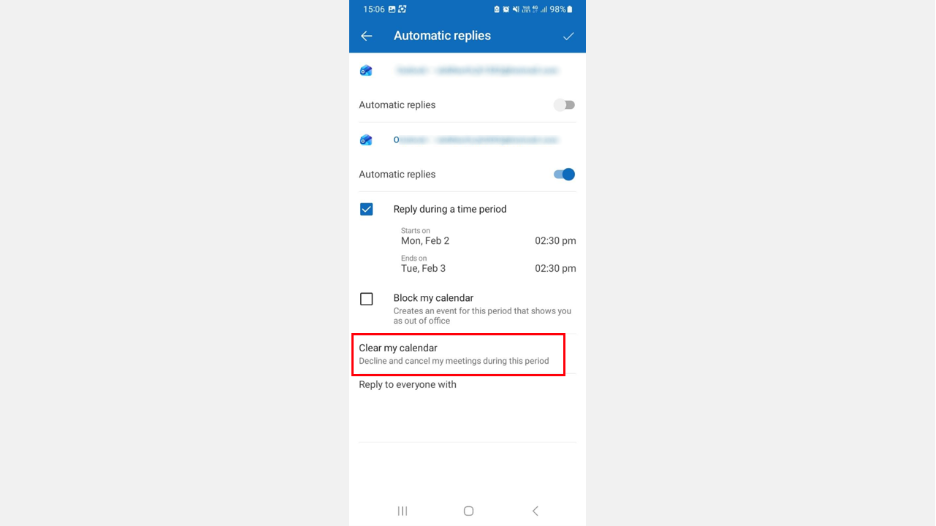
- Select “Reply to Everyone With” and create a tailored reply for all your senders.
Advantages of Utilizing Auto Replies
Auto Replies in Outlook are an effective way that simplifies communication and improve your professional image. Executing auto responses provides numerous key benefits:
- Constant Interaction: Automatic replies make sure that your contacts get updates in a timely manner, even when you are not available. Whether you are heading out for a meeting at a client’s place, taking a vacation, or availing a sick leave, automatic replies make sure that your communication remains professional and consistent.
- Time Efficiency: Instead of replying manually to every email, automatic replies enable you to automate this process. This empowers you to save crucial time, enabling you to emphasize vital tasks without ignoring incoming emails. Businesses also go for specialized tools like GuestPostCRM for automated AI replies.
- Keep Senders Informed: Auto responses can update senders that you are currently unavailable and provide clear information on when you will be available again and respond.
- Enhanced Customer Service: For businesses, auto replies are non-negotiable. If a customer reaches out during non-business hours, automatic replies acknowledge that their message has been received. Personalized automatic responses can also provide alternative contacts or additional resources that they can go through in the meantime. This plays a critical role in improving overall customer satisfaction.
- Flexibility and Personalization: Outlook allows you to personalize auto replies as per particular criteria like time periods, recipients, or message content. This makes sure that automatic replies are relevant for distinct scenarios.
- Professional Image: Setting up automatic replies showcases that your business gives importance to prompt communication. This shows that professionalism can boost relationships and establish trust with clients, colleagues, and partners.
What Are the Right Practices for Effective Auto Replies?
Setting up auto replies is a simple way through which you can efficiently handle communication. To make sure automatic responses are helpful and efficient, you can follow these right practices below:
- Keep It Clear and Concise: Make sure that your auto reply keeps senders informed about your availability and provides all the key details. Avoid going for long or confusing messages.
- Choose the Right Message Format: Auto replies indicate professionalism, but all will go in vain if you choose a cluttered or unclear message format. Treat auto replies just like a real-time message. Start with standard greetings, then mention your unavailability, provide a return date, and offer alternative contacts or urgent contact procedures. This can help you correctly manage expectations and appropriately direct inquiries.
- Ensure a Professional Tone: The whole purpose of auto responses is to show professionalism. So, maintaining proper grammar and polite language is of paramount importance.
- Personalize for Distinct Scenarios: Create tailored auto responses for different situations, such as out of office, vacation, or busy periods. This makes sure that your message is contextually relevant.
- Always Use Auto Reply for a Specific Time Period: It is advisable to choose auto response only for a specific period. Auto replies will automatically activate and deactivate as per your “Start” and “End” times. This will allow you to prevent sending outdated messages to your senders.
- Test Your Auto Response: Before deploying it fully, check its functionality by sending test emails to your colleagues and yourself.
- Regularly Update: Consistently update your auto reply, especially when your contact details or availability change. This ensures the accuracy and professionalism of your communication.
Summary
Setting up auto replies in Outlook is a vital skill that efficiently improves your communication, specifically when you are away for a while or unable to respond. Once you set up auto replies, you can make sure that the clients, colleagues, and contacts are apprised of your absence or delayed responses, ensuring clarity and professionalism. The process involves accessing the Automatic Replies feature of Outlook on web, desktop app, or mobile. You have the option to tailor your message and decide the duration during which the replies must be active. The steps are similar across all platforms; only the interface varies slightly. It is important to double-check your message content to make sure there is correctness and clarity in your message.
Similarly, we have demonstrated “how to set up automatic reply in Gmail.” Be sure to check out that blog.